Pages

Saturday, November 23, 2013

DIY weekend

Regardless of this and the previous post I am not, I repeat, am NOT a DIYer.  I am a quitter.  Better yet, I'm an ideas gal.  I come up with the concept, but my execution lacks finesse and often lacks actual finishing.  This is why I am a great purchaser and hire-er.

Any-who.

I purchased a Moroccan Wedding blanket on my honeymoon in Marrakesch and since then I've wished that I snapped up a few more or at least a more flamboyant and sparkly one.  I can buy them any day of the week online, but it's nice to know I actually picked mine out in a souk.  While out yard sale-ing earlier this month, I spotted a huge and very shimmery wedding blanket and snagged it for $20.

See?  Shimmery!

I did my best to spot clean it and got it in my head I wanted to use it to make a large ottoman for my dressing room.

Not a new idea, people.  Have your very own from Calypso Home.


However, I like it and thought I could do it cheap.

So, I purchased a hideous looking ottoman of the right size from Home Goods.


I even talked them down on price because there were two tiny tears in the bonded "leather," which I learned after lugging it home & flipping over is cancer causing.  Really. A tag on the bottom said that this darn thing causes cancer.  Decoration before health though, right? *

I wrapped the wedding blanket around it like a present,


And then nailed the fabric to the bottom frame with small picture nails.  I also had a staple gun, but because I was not ready to cut the blanket up, using fewer nails on the corners worked well for now.


Voila!


*This author does not condone bringing cancer causing agents into a home.  Prospective clients, please fear not.


Also - harmful carcinogens result if the ottoman were to burn.

Tuesday, November 12, 2013

Ikea light transformed

I can't take credit for this DIY Ikea light transformation.  I've seen it on many design blogs.  What can I say?  It's a goodie.

Like all Ikea items, the fixture comes in a box full of parts; assembly required.  I suggested we paint the white paper lantern gold or two-tone.  It was settled that the interior would be gold (in hopes it would glow) and the exterior would be navy blue.

We painted the interior of the paper starbursts first.


Then the outside.  The blue did not come out as navy as advertised, but I think spray paint on paper comes out a little different than the color on the can implies.

We clipped on each paper piece to the "antenna."


And then the "antenna" onto the globe frame.


Halfway there.


And Viola!  Looks cool at night.  The gold glows warmly and the shadows on the ceiling and walls are great!


Monday, November 11, 2013

more lighting

Here is the continuation of our lighting installation.
The most important and risky choice was the master bedroom chandelier.  I say risky because I ordered a chandelier through a catalog and didn't spend an arm and a leg.  When it comes to crystal chandeliers, I find them cheap and tacky looking if they are not, you know, expensive.  Very expensive.  And vintage.
Opening the box, I had doubts.  Plus, I had to put it together, strand by strand.

Frame was installed.

And the process begins.  One strand at a time.


Paused for a hand cramp.  One more layer to go.


Viola!

Please do not judge the venetian blinds.  They are outta here this week!  More on that soon.


We also added a ceiling light at the top of the stairs.

A similar style pendant to the side mud room:

My beloved Punch sconce to the ceiling at the back stair case.  This one needs a different bulb.


Saturday, November 9, 2013

new lighting

If any of you have been reading my blog, you know that I love lighting.  It may be my favorite aspect of a design.  I never tire of scouring websites, auctions and antique stores for interesting lighting.

Yesterday, the bulk of remaining light fixtures were installed.  Here are the results!

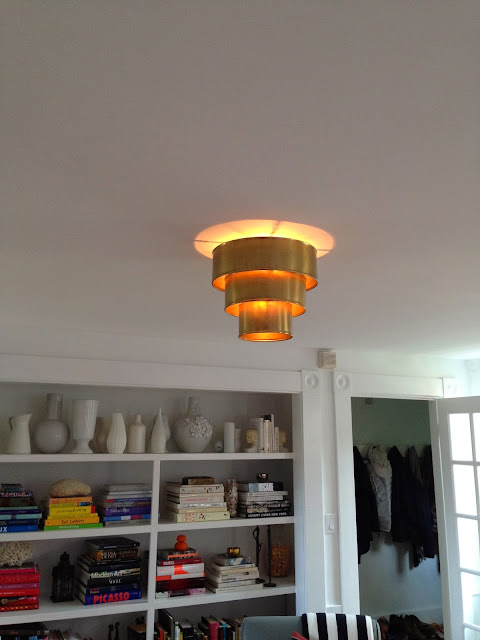
The family room had a single bulb for a while.  Here is the new brass fixture:

Check out how it glows.

An upside down gilded wedding cake.

Until I find and am ready to splurge on a dining room chandelier, I put up this inexpensive paper globe.


It compliments and does not compete too much with the sculptural Workstead fixture in the living room.

Bryant sconces in the powder room (which you've seen here.)

In the kitchen over the sink we installed these handmade brass pendants from OneFortyThree


You've seen my best antique chandelier before and it looks great over the kitchen table.

We moved two of the Urban Electric Co. sconces to the DR and one into the entry.


I am still seeking out sconces for the library, which is my favorite room that is not nearly complete yet. More lighting to come!!

Tuesday, November 5, 2013

powder room power

A powder room is my favorite place to decorate.  It's small and intimate.  It is used for small amounts of time & it requires lighting and a mirror.  Two of my favorite things!  For all of those reasons you can go bold and bizarre or glam and dramatic.  Our last renovation resulted in a super cool powder room.  It was a tiny space, but one of my favorite rooms.

The walls were lined in beautiful walnut flooring thanks to Jeffrey Katz & Kevin Musumano from C & J Katz Studio.  They had this vision on another project and it really worked well for mine. It created this warm enveloping texture.  I painted the ceiling metallic gold while the floors that ran from the kitchen were painted Farrow & Ball's Arsenic.
A truly amazing color.  The contemporary pedestal sink with streamlined faucet had a solid presence.  It looked more or less like this:

and the sconces were
the Punch sconce from one of my favorite resources, Urban Electric Company.
I love EVERYTHING they make.

This time I've made the powder room more classic and glamourous.  I had some more room to work with and have been making design decisions based more on the type of house and re-sale capabilities. Here some pretty drastic before and afters!

Before....
Clunky ugly vanity

Old school gravity toilet with wooden seat, ugh.

Terrible lighting.

I considered re-using the pedestal sink from upstairs.

Or finding a salvaged sink with real history.


But didn't I want to transform the space away from that old-timey look?

I decided on the Gramercy glass washstand from RH:

Painted the walls & trim the same rich blue, Ben Moore's Kensington Blue.  This is a good dark blue that has a touch of gray if you want to keep away from having a nautical feel.

The old threadbare red rug is a great contrast with the wall color.  Also it gives the room an old library feeling.  (Sorry about the toilet paper in view.  It wasn't complete at this stage!)


I choose a metallic pewter paint for the ceiling which combines the golds and silvers.  There is a mix of polished nickel & antique silver in the hardware and some gold tones on two mirrors in the room.  Yes, there is that infinity effect because there are mirrors facing each other.  Very cool in person.


I used the classic Bryant sconce from Visual Comfort because my beloved Punch sconces did not provide enough light.  We couldn't add an overhead chandelier so the two sconces are my only light source.


Moody & chic, non?

The last touch is the window treatment which will be a Roman shade made from this metallic linen that is going to kick ass. 


I'll make an update when the treatments are installed.  Hopefully soon.  I don't want to meet my neighbors that way.

Stay tuned.

xxL